Getting Started
Installation
Simply download the .msi file from the Release page and run the .msi installation.
Prerequisites
None.
Note
Tabular Editor uses the Tabular Object Model to load and save metadata to and from Model.bim files or existing databases. This is included in the .msi installer. Visit the official Microsoft documentation for Analysis Services Client Libraries.
System requirements
- Operating system: Windows 7, Windows 8, Windows 10, Windows Server 2016, Windows Server 2019 or newer
- .NET Framework: 4.6
Working with Tabular Editor
The recommended workflow is to set up the tables and relationships using SSDT as normal, and then use Tabular Editor to do the rest. That is: Create calculated columns, measures, hierarchies, perspectives, translations, display folders, and every other kind of fine-tuning you can think of.
Load a Model.bim file by choosing the Open > From File... option in the File menu (CTRL+O), or open an existing database from an instance of Analysis Services by choosing the Open > From DB... option. In the latter case, you will be prompted for a server name and optional credentials:

This also works with the new Azure Analysis Services PaaS. The "Local Instance" dropdown, may be used to browse and connect to any running instances of Power BI Desktop or Visual Studio Integrated Workspaces. Note that although Tabular Editor can make changes to a Power BI model through the TOM, not all modeling operations are supported by Microsoft. More information
After clicking "OK", you will be presented with a list of databases on the server.
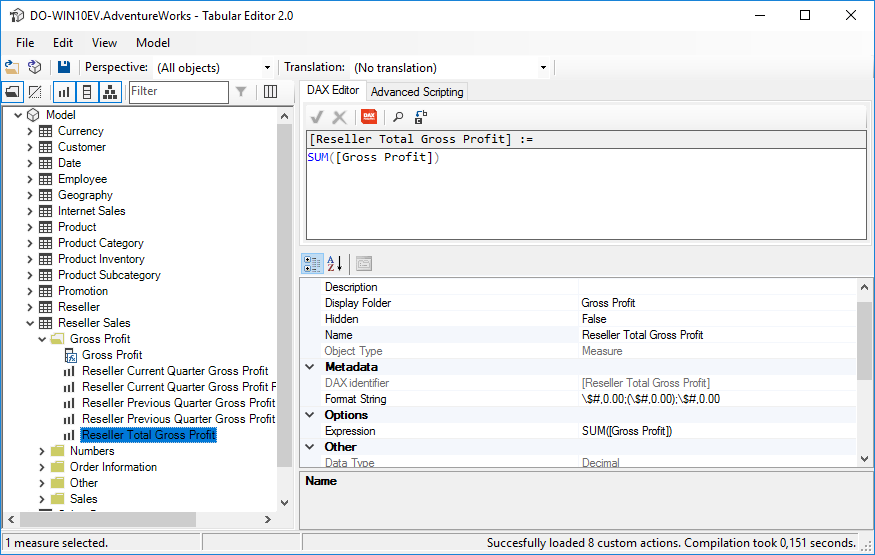
This is how the UI looks after a model has been loaded into Tabular Editor:

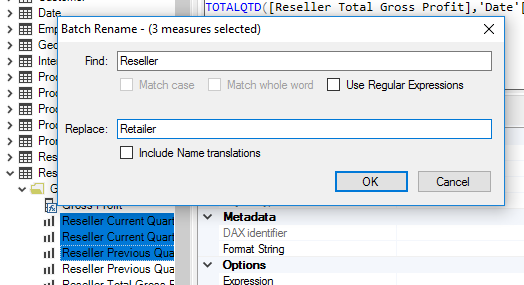
The tree on the left side of the screen, displays all tables in the Tabular Model. Expanding a table will show all columns, measures and hierarchies within the table, grouped by their Display Folders. Use the buttons just above the tree, to toggle display folders, hidden objects, certain types of objects, or filter out objects by names. Right-clicking anywhere in the tree, will bring up a context menu with common actions, such as adding new measures, making an object hidden, duplicating objects, deleting objects, etc. Hit F2 to rename the currently selected object or multiselect and right-click to batch rename multiple objects.

On the top right side of the main UI, you see the DAX Editor, which may be used to edit the DAX expression of any measure or calculated column in the model. Click the "DAX Formatter" button to automatically format the code through www.daxformatter.com.
Use the property grid in the lower right corner, to examine and set properties of objects, such as Format String, Description along with translations and perspective memberships. You can also set the Display Folder property here, but it's easier to simply drag and drop objects within the tree to update their Display Folder (try selecting multiple objects using CTRL or SHIFT).
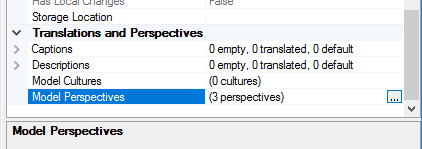
To edit perspectives or translations (cultures), select the "Model" object in the tree, and locate the "Model Perspectives" or "Model Cultures" properties, in the property grid. Click the small elipsis button to open a collection editor for adding/removing/editing perspectives/cultures.

To save your changes back to the Model.bim file, click the save button or hit CTRL+S. If you opened an existing Tabular Database, the changes are saved directly back to the database. You will be prompted if the database was changed since you loaded it into Tabular Editor. You can always undo your changes by pressing CTRL+Z.
If you want to deploy your model to another location, go to the "Model" menu and choose "Deploy".
Deployment
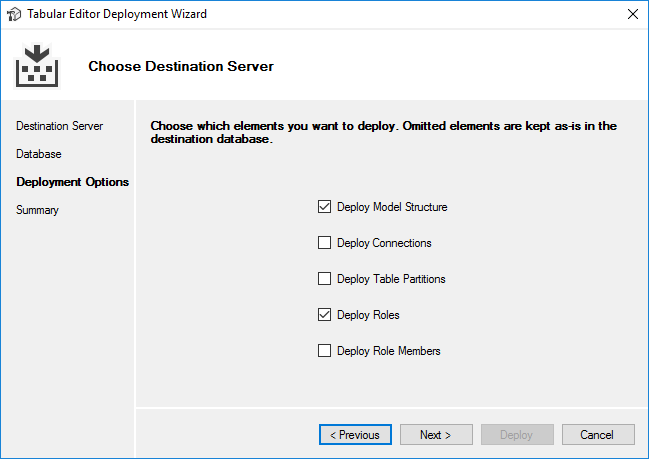
Tabular Editor comes with a deployment wizard that provides a few benefits compared to deploying from SSDT - especially when deploying to an existing database. After choosing a server and a database to deploy to, you have the following options for the deployment at hand:

Leaving the "Deploy Connections" box unchecked, will make sure that all the data sources on the target database stay untouched. You will get an error if your model contains one or more tables with a data source, that does not already exist in the target database.
Similarly, leaving out "Deploy Table Partitions", will make sure that existing partitions on your tables are not changed, leaving the data in the partitions intact.
When the "Deploy Roles" box is checked, the roles in the target database will be updated to reflect what you have in the loaded model, however if the "Deploy Role Members" is unchecked, the members of each role will be unchanged in the target database.
Command Line usage
You can use the command line for automated deployment. All deployment options that are available through the GUI, are also available through the command line.
Deployment Examples
TabularEditor.exe c:\Projects\Model.bim
Opens the Tabular Editor GUI and loads the specified Model.bim file (without deploying anything).
TabularEditor.exe c:\Projects\Model.bim -deploy localhost AdventureWorks
Deploys the specified Model.bim file to the SSAS instance running on localhost, overwriting or creating the AdventureWorks database. The GUI will not be loaded.
By default, partitions, data sources and roles will not be overwritten in the target database. This behaviour can be changed by adding one or more of the following switches to the command above:
-POverwrite partitions-COverwrite connections (data sources)-ROverwrite roles-MOverwrite role members
More information on command-line options can be found here.
Note
Since TabularEditor.exe is a Windows Forms application, running it from the command line will execute the application in a different thread, returning control to the caller immediately. This may cause issues when running deployments as part of a batch job where you need to await succesful deployment before proceeding with the job. If you experience these issues, use start /wait to let TabularEditor finish its job before returning control to the caller:
start /wait TabularEditor.exe c:\Projects\Model.bim -deploy localhost AdventureWorks
Advanced Scripting
Tabular Editor lets you use C# to script changes to the loaded model. This is practical when you want to apply several changes to many objects at once. The Advanced Script editor has access to two objects:
Selectedwhich represents all objects that are currently selected in the explorer tree.Modelwhich represents the entire Tabular Object Model tree.
The Advanced Script editor has some limited IntelliSense functionality to get you started:

More documentation and examples on Advanced Scripting, can be found here.